Thursday, October 28, 2021

Before School B


The Before Photos

What did I walk into? School B

    Before the school year even started I was already exhausted just with school A.  Luckily or unluckily the second school library some books were shelved and the boxes put in another room.  This meant the boxes are even more mixed up.  In addition I felt pressure to sort through the boxes quickly so the band teacher could have the room back.  I don't have pictures of the HUGE pile of boxes for this school.  Most of the boxes were overpacked and breaking open.  This library went through a complete renovation and looks wonderful but unfortunately the number of shelves was greatly reduced!
    
    So I begin the process of getting through the boxes in the band room by weeding as I unbox.  Forget about doing it in any sort of order.  I could barely move these boxes.  I ended up weeding and discarding  2000+ books.  These books were in bad shape and or outdated.  I hauled by book cart the books I selected back to the library.

    Here are the before pictures without the band room pile.


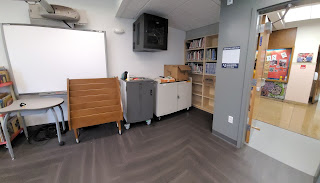
    The tables and chairs will be replaced they are just temporary till the order comes in.  The space looks great but has been a challenge.  I had to start teaching with the first day of school so no time to shelve books.  It has been a slow process but the band room is clear of library boxes.  I was able to put some picture books out for students to check out.  I have had to make decisions on the go.  I decided to put the holiday books in the cabinet you see in the last photo.  I have a cart that I will be putting books to highlight the season and holidays.  I didn't want to use shelving space for the holiday books that are used once a year.  These two cabinets are also the only storage space in the library.

    The school is a K-5 elementary and I gave students a chance to provide feedback on the library.  They loved the space but did not like how the books were shelved so far.  Now I needed to make more decisions faster.  This meant moving the books already on the shelves and reorganizing.

    I can't wait to get the last section finished and the last of the non library items out of the library.  The Non-Fiction sections are finished, had to create a section of each non-fiction for the youngest grades.  Bonus is that with these books seperated I don't have books falling behind other books.  Fiction (long) and Fiction (short) sections are finished.  Graphic novels are finished.  The reader section of books is on the shelf and I will come back to that to organize it better.  

    The last section is the one I am tackling now and that's the picture book section.  I have seen students at both schools use the picture book section.  They wander aimlessly and pull random books off the shelf that makes a mess.  Plus students are not really getting books they want to read.  I have decided to sort the picture books not by author but by topic.  I have sorted a couple bins of books and the students are enjoying selecting from these sections.  So I know I am on the right track.

The Before Photos What did I walk into? School A

The Before Photos

What did I walk into? School A

    Before the school year even started I was already exhausted.  School A the week before school was to start and all the books are still in boxes and the shelves still to be assembled.  I ended up with 3 days to unbox and shelve everything!  I have a great group of fellow librarians in the district.  They came and helped get the work done.  There is no way that I would have even come close to being done without their help.


    Boxes had to be moved and sorted into the correct order for unboxing.  They had to be moved so we could get to the shelves to put the books on them.  Looking at the photos now it doesn't seem that bad, but it was!  The boxes were moved several times and each time they were tossed and mixed up.  Even though the books are on the shelves the work is not done.  I am still working on better organization to make it easier for students to find books. 

    The shelves were set up in a good layout but the circulation desk was not.  It was put where the last librarians thought would be a good spot.  The desk was split in two.  One was put over by where the smart board will be.  I call this the classroom area.  You can see the other half in the last picture.  The desk has the backside of the desk facing the door and I don't like my back to the door. Plus you can see the mess that usually accumulates in the desk area.  To top that off there is no power outlet and no ethernet port on that side of the room.  So I tried wireless internet and that is not reliable plus running an extension cord to get power to the computer.  This is just not working.  The desk it useless and is now piled with books.  Some to discard and a bunch to figure out a location to put them.  I have been unsuccessful at getting the desk rotated to the other wall.  It's not far to go but the desk is too heavy to move.

Next post the before photos of School B.
 

Friday, October 22, 2021

New School Year New Schools


 New School Year New Schools

Tammy Cummings Library Media Specialist Binghamton, NY

    Well this year has already been full of adventures.  Just over a year ago I switched school districts.  This meant working in two school libraries and moving to a new area.  Binghamton NY is now my home.  I've officially settled down or at least I had thought I settled down.  The district hired another librarian (or rehired one) and switched up who was working at which schools.  This meant two new schools and two new collections.

    Last year was the chaos of the pandemic and teaching asynchronously for part of the school year. Plus getting to know two new library collections. One school had over 700+ books that needed to be sorted through and cataloged.  Luckily I had help with that from Library aids and School Library Services.  Then having to make space for Covid testing in the library for part of the year and push into classrooms at both schools.  Towards the end of the school year I was finally able to have classes in the library!  I survived the school year, but then they sprung on us the switch up of locations!

    Start of this school year I found myself assigned to two different schools both of which the school library had undergone renovations!  All the books were in boxes at both schools!  Luckily at one school (School A) I had the help of other librarians in the district to unbox the books.  Managed to get this done before school started but it was still organized chaos.  Unfortunately at the other School (School B) I didn't have help unboxing the books until after the school year started, but the boxes were out of sight and I could start teaching right away.

    School A is a great space but the smart board is not up so I cannot project anything!  I do have two monitors so I use the second larger one to show students videos and such.  I only lost a little bit of shelving in the renovation at school A.  The collection is in desperate need of weeding.  About 900 books have been weeded as we were shelving.  The picture book section still needs to be weeded. 

    School B is an awesome space but shelving is very limited!  That has been the biggest issue with school B.  Very little was done before the school year started, but what was done the students did not like.  The principal had older tables put in the library so students had a place to sit to work.  At some point this school year the library will get new tables and chairs.  Learned the hard way that the projector does not work for the smart board and I am waiting on it being repaired.  Luckily there is a smart TV in the library and I use that instead.  The boxes of books were stored erratically in the band room.  I felt bad about taking up this teachers space and pushed myself to sort and weed fast!  Total so far of weeded books at School B is around 2000.  But all those books really needed to be weeded.  I still have my book budget for this year and need to get the orders placed.  Now I am am down to the books that really should stay.  I have almost completed the Non-Fiction (Informational Text) part of the collection, the biography section, readers, graphic novels and Fiction sections of the collection.  That leaves the picture books to get shelved.  Not enough room to shelve them plus I need to decide on how to shelve them.  Thankfully I do have help now with completing this library.

Things that I learned during this process:

1. Librarians don't get to pack boxes up at their pace and many non librarians will pitch in to get the work done!
2.  Boxes once packed will be moved an mixed up during the renovations!
3.  Librarians most likely won't get a say in the renovation.  You will be asked to spend a ton of time planning it but then the decision is not in your hands.
4.  Take care of yourself.  I pushed myself too hard and ended up sick for almost a week.
5.  Principals will say take your time and take care of yourself but they really want it done as quickly as possible.

This is the end for today.  I will start my next post about the decisions that I had to make and share some before and after photos of the progress so far.

Wednesday, July 31, 2019

Rocket Books Customizing

Customizing your Rocket Book

Written by Ms. Cummings
CiTi Library Media Specialist

What are some of the best ways to customize your Rocket Book?

Plus a couple tips for working with the Rocket Book.


What is a Rocket Book?  A Rocket Book is a reusable notebook that you wipe away the writing/drawing with water.  I prefer the Everlast Letter size version and the NEW Fusion is terrific. I found a letter-size portfolio to hold my book and supplies.  I even have a place to put my Rocket Book Beacons!  Never know when you want to scan something on the go.  It's summer so I hope I run across some sidewalk chalk drawings and just plop down the beacons and scan away and email it lickety-split.  Also, upload to my Google Drive to share with students and add to my maker space lesson plans.
Rocket Book Fusion in a 

"What is the Rocket Book Everlast?

The Everlast notebook provides a classic pen and paper experience, yet is built for the digital age. Although it feels like a traditional notebook, the Everlast is endlessly reusable and connected to all of your favorite cloud services. ... The Everlast notebook is compatible with the Rocketbook app."
I remember when I was in High School using erasable pens and it just left smudges everywhere.  Technology has come a long way and the Frixion pens and fine tip markers are terrific.  I find I not only use them with the Rocket Books but also on regular paper all day long.

Rocket Book offers PDF files and I used these to test out my templates when I created them and to see how they worked when used.  This is an important step don't skip it!  The custom pages so far with more to come:

  • my monthly calendar
  • Purchase Order submissions
  • Library Collaboration form
  • Unit lesson Planner
  • Library Lesson form

Using Vinyl to customize

How did I actually get these onto my rocket book pages?  I have a Cricut machine that I have cut the individual items out of vinyl but I found they peeled off after a while.  It's the fine lines that tend to peal while larger letters and images stay put.  I will be using the iron Cricut material to add details to the portfolio to make it easier to find and vinyl can be used on the cover of the Rocket Book itself.


Taking apart the Rocket Book

The best way that I found to Customize the Rocket Book is to take apart the Rocket Book.  This is not for the faint of heart.  I did ruin several pages when I was trying this out due to my own mistakes, but I learn from my mistakes.

I took a pair of plyers and gently unbent the top spiral.  I did not have to do that to the bottom one but did have to push it over to the other side so it would untwist.  I twisted the spiral right off.  Now the pages are loose and I can customize them and put them in any order that I want.  I recommend printing on the dot pages and not the lined pages.  Lined pages are harder to match up when printing.

Warning: I have found the silver spiral to be a bit brittle.  Becareful when bending this one.  The black spirals are pretty flexible and I had no trouble taking it apart several times with no issues.


Creating customized pages to print on the Rocket Book Pages

In Adobe editor I took pdf of the letter size dot page and I clicked on edit pdf.  Let the software do its job.  I used PowerPoint to create the color sections of the tables and added them to Adobe. I was then able to add in any words that I wanted on the page and line them up.  I then removed the background image of the rocket book page.  This left me with only what needed to be printed on the page.  I used the office laser printer/copier and passed the pages through the paper bypass tray.  

  1. Don't fill the page with tons of images.  My first mistake was putting a table with a colored background.  First, it curled the page as it went through the copier.  It did eventually flatten but the colored areas did not scan well.  So keep it to a minimum on the solid objects.
  2. Only use the bypass tray and do it when the secretary isn't there to "gasp" at what you are about to do. :)
  3. The pages will temporarily curl a little bit or have waves but it does flatten out quickly especially after putting the notebook back together.
Here are some images of what I customized:  
You will notice that I started out at the top of the page with the start of the auto file naming.  This way I can write in what I want the specific file name to be each month without having to type the file name in each time.  It works!
Monthly Calendar

Monthly Purchase Order Tracking
Library Collaboration Page


Library Unit Lesson Planning


Library Lesson plan template


Graphic Organizers

I am testing graphic organizers this next school year.  I have them created using the pdf files Rocket Book makes available.  Once I have tested them with a class or two I will then make any necessary changes and then print them on Rocket Book Pages.  I plan to have a class set of Rocket Books with Customized pages and regular pages for note-taking.  I have not tested the graphic organizers enough yet to actually print the class set.


Putting the Rocket Book back together

One final step is to put the Rocket Book back together.  Organize your pages in the order you prefer.  I put a regular page in between my custom pages for easy access to those pages.  I put them basically in places where I need extra writing space.  Once the pages are in order and put the covers in place and line up the holes and twist the spiral back on starting at the bottom.  Once you have twisted it up you will need to push the bottom of the spiral over to the other side.  Then at the top use the plyers to bend the last part back into place carefully.


As I promised here are a few tips for working with the Rocket Books!


  • Go to the makeup area in a store like Walmart or Dollar Tree!
  • Pick up a package of the triangle makeup sponges and a small plastic container to put one or two in.  This way you can keep them by your desk to wipe away errors.  I know they say to use a spray bottle but that is great for erasing a whole page and not a partial page.  The makeup sponge gives you more control.  Then use the cloth to dry the page before writing on it again.
  • My favorite makeup sponge is the green one in the photo below.  I keep this available for when I need to remove a small area or one letter.  No more licking your finger to erase that pesky mistake.
  • The last is the water bottle shown in the photo.  It has a mechanism on top that you press down to release a few drops of water.  See second image below.  Much easier to use than spraying the whole page.

Dollar Tree Items to use with the Rocket Books.
A bottle that has a plunger.


I will leave off with my favorite Fixion Pens/Markers


NOTE (Disclaimer): This blog post shares my experiences with the Rocket Book and customizing mine.  I do not know for sure what will happen when/if you try this with your own Rocket Book and laser printer/copier.  Do this at your own risk.  I did ruin a couple pages but it was worth it.  Mine turned out and the pages are still writable, erasable, and scannable with the app.

#rocketbook #gokaitiaki


Wednesday, June 19, 2019

Can you fit it in a box?

The TechWizard's Guide to Library Magic

Written by Ms. Cummings
CiTi Library Media Specialist

Can you fit it in a box?


The school year is coming to an end and it is time to start planning for next year.  I am lucky to be working summer school again this year.  Summer School gives me an opportunity as a librarian to try out things that I am not sure on.  This comes from working in a High School environment where there is not enough time to do things that have not been tested.  Summer is just as stressful getting ready for Regents exams and credit recovery but for Middle School, you get a chance to breathe. 

Every day I start my day out by looking at yahoo.com and newsfeeds on other websites.  One day I saw a post about "Museum in a box".  I took that chance that it was not click bait and clicked away.  I found a treasure trove of opportunities to turn a research paper into something more.  A website for a good overview of what these boxes are is at http://www.museuminabox.org/

I'm looking at the website and thinking that we could do this.  It would tie in with research, our 3D printers, and digital storytelling.  I have a wonderful technology department at school, but I would have to be able to do this with students with a minimal amount of help.  I know they would be there if I got stuck so I didn't go into a panic.  I just needed to figure this out but not by myself.

As high school students come to the library I start to have discussions about the project idea.  The discussions started out with what is a museum in a box and can you really fit that in a box.  Then moved on to how does it work and what can we use.  We decided to start out with a Raspberry Pi (RPi) device and an NFC reader, the second I have not yet used with the RPi.  I do have a backup plan if this doesn't work.  I'll clue you in on that later on probably in another blog post.

The library has limited funds for projects and this means I need to look for funding for this project.  Students were anxious to get started and we're already looking at other ways to use the RPi.  I had to break the news that we had to wait until the next school year.  The library needed about $2000 for this project and I decided to apply for NYSCATE grant for up to $2000.  I filled out the application with a budget with input by the students.  Then I had to wait and keep looking for possible other sources of funds.  Students kept asking and I kept telling them to wait for June.  I did prepare students by telling them how competitive grants are and that we may not get it.   And we waited.............

June 1st came and the students asked and again I said we have to wait some more.  The students started to get frustrated at that point.  Mid-June came around and they stopped asking.  I got an email that the Library received the NYSCATE grant for the full amount we requested.  I told one student and the rest knew within an hour.

I am excited about this project and can't wait to get working on it next year.  Summer school is quickly approaching and why not start exploring the Raspberry Pi with the summer school students.  I have one or two already just sitting in the cabinet.  I plan to pull out the devices and see what the summer school students can do with them.  I will be doing Maker Space projects for Middle School Summer School students.  Let's see what they can create.

Continue to watch my blog for updates on this project and other items of interest to grades k-12 and the library connections.

This post covered the

  • project idea
  • student connections
  • finding funding

The next posts will cover

  • Receiving the project supplies and how to manage them
  • Plan B if we can't get the technology to work
  • Digital Story Telling - Students will do the job of a museum Docent
  • 3D printing objects for the boxes
  • How it all turns out - and how you can try out of boxes

Thursday, May 9, 2019

Reading Logs going digital how to and the benefits of going digital Part IV

The TechWizard's Guide to Library Magic

Written by Ms. Cummings
CiTi Library Media Specialist

Reading Logs going digital how to and the benefits of going digital 
Part IV


After Steps 1-3 you will be glad to hear that the Teacher Dashboard is the easiest one to create!

That being said you have a few things to consider.  Primarily confidentiality!  I highly recommend that you double check your school's requirements for this.  I have my REAL teacher dashboard set to only those at my school can view.  REAL is in reference to my dashboard and not the shared copy with fictional data entered.  After some research about our teacher and student accounts, I find that I need to turn link sharing off so that students don't see this data.

In the library, students have a right to privacy especially when it comes to their circulation records.  The American Library Association (ALA) a national association for Libraries has posted the Library Bill of Rights. That right to privacy includes protection to the student reading logs.  As of writing this post, I have decided that I need to have the Link Sharing on the Teacher Dashboard turned off and set to share with specific people.  This means each year I will have to go in an manually add and remove people from the "shared with list".  I just don't feel comfortable with the link sharing turned on even with it set to only those at my school with the link can view.  I will have to continue to debate this and check with the technology department and my admin before making a final decision before the start of the school year.

Creating the Teacher Reading Dashboard


You will need to refer back to Step 2 - Create the Public Reading Dashboard and create a new Google Data Report and linking it to the same Google Sheet.  YOU DO NOT have to create another Google Sheet use the same one that you used for the other Dashboard.

Once you have the new report set up and you see the graph paper image

List of student data Section:
  1. You will click on "add a chart" and select Table - the first one 
  2. The data source will be your Google Sheet
  3. Data Range dimension MUST be Timestamp
  4. The dimension will be all the ones you would like to appear on the dashboard.  I put in Date (click on edit to format the date to what you want), Email and/or First & Last Name, Book Title, Author, Genre, Rated Finished or Abandoned (I edited this to shorten it to F/A)
  5. Rows per page will reflect your layout. Leave pagination on for this table.
  6. Sort by TimeStamp - You will be able to click on any of the columns to sort the data by.
  7. You will have to manage your space because more columns may mean that your filter boxes will have to be smaller.  You still want it to be readable.
I added a text box at the top to label this dashboard
I also added a text box to head the column of filters


The Total Books Read section:  The number that appears in the box will reflect the one or many filters that are selected.
  1. You will click on "add a chart" and select Scorecard - the first one that says Total
  2. The data source will be your Google Sheet
  3. Data Range dimension MUST be Timestamp
  4. Metric is Book Title - click on edit after you add it- make sure count is selected.  Hard to see at times.  Hover to the left of Book Title in the Metric column and you will see it change to a pencil then click to edit
  5. Now to add a filter - the best place to do this is through the menu at the top.  Click on RESOURCE and MANAGE FILTERS.  This way you can reuse the filter.  You may see the filter you created for the other dashboard (skip to # 11) if not follow the same steps to create the filter for this one.
  6. Click on ADD A FILTER
    1. Set filter to "INCLUDE"
    2. Set Search Fields to Did you finish the book question
    3. Set next field to Equal to (=)
    4. Next field type in what your entry was for Finished.  Be sure to type if correctly or it won't work.  I copied and pasted mine from my Google Form.
    5. Now go back to editing the scorecard down to the Filter section.  Click on ADD A FILTER and select the filter for Did you finish the book that you just created.


    Filters in a box - add as many as you can.  Create them individually and place them under the "Filter Options" box.

    1. When you click on Filters (3 lines) a box outline will appear just like a text box
    2. I typed in the name for the filter and enlarged the font through STYLE tab.
    3. The data source will be your Google Sheet
    4. Data Range dimension MUST be Timestamp
    5. Dimension can be any and all of the questions you asked on your Google Form.
    6. For the Data Range, you will click on the calendar icon - this will only work properly if you set each chart & filter to have the Data Range Dimension as Timestamp.
    7. I have a filter for "Next Book" but it does not display on this dashboard.  I might take it out at this point.  I am undecided.
    8. I think I need to go back and add the filter for Finished and Abandoned books.  The total number of books is only Finished books but the listing of books enter by students includes bot finished and abandoned books.
    Arrange your Teacher Reading Dashboard the way you want to add a header too.   Turn "Embedding OFF" unless you embed it on a password protected webpage.  Remember this information is considered confidential information.  Your display should now be working.  Test it to make sure the displays change as you apply filters.  Let the teachers using it know they can print to add it to student records if needed.

    Library purposes of this display:
    1. A display in the library that students can look to for inspiration
    2. Being able to see what books student like and don't like and their genre
    3. Will influence book purchasing for the library
    4. Talking points with teachers and students
    5. Book recommendations - so I don't recommend a book they already have read.
    6. Random awards for those that are reading - I like to give out stuff during the school year.  Mostly pens and pencils, headphones, post-its and other useful stuff.

    Still to come is the student dashboard so they can see what reading logs they have turned in already.  A double check to see if they forgot to turn one in.  That is still in the works and when I get it working I will share it with everyone.


    Reading Logs going digital how to and the benefits of going digital Part III

    The TechWizard's Guide to Library Magic

    Written by Ms. Cummings
    CiTi Library Media Specialist

    Reading Logs going digital how to and the benefits of going digital 
    Part III


    Last time we walked through the steps of creating your dashboard file and connecting your data to it.  See Step 3 if you need to.  This time we will be working on each of the sections of the dashboard.  I highly recommend that you don't just recreate what I have created but customize it to your school's needs.  The last post already told you how to create the header for the whole dashboard.  It's simply adding a text box, resizing, an adding a color.  You will repeat this to create headers for each of your sections.  It's easier to do after you have added the section.  Once you have a section created and labeled you can group them together to make it easier to move around and resize.  From the drop-down menu for "add a chart", you can see all the different types of options you have for your dashboard.  See the image below.  Take a little time to explore and try a few out.

    The Total Books Read section:
    1. You will click on "add a chart" and select Scorecard - the first one that says Total
    2. The data source will be your Google Sheet
    3. Data Range dimension MUST be Timestamp
    4. Metric is Book Title - click on edit after you add it- make sure count is selected.  Hard to see at times.  Hover to the left of Book Title in the Metric column and you will see it change to a pencil then click to edit
    5. Now to add a filter - the best place to do this is through the menu at the top.  Click on RESOURCE and MANAGE FILTERS.  This way you can reuse the filter.
    6. Click on ADD A FILTER
      1. Set filter to "INCLUDE"
      2. Set Search Fields to Did you finish the book question
      3. Set next field to Equal to (=)
      4. Next field type in what your entry was for Finished.  Be sure to type if correctly or it won't work.  I copied and pasted mine from my Google Form.
      5. Now go back to editing the scorecard down to the Filter section.  Click on ADD A FILTER and select the filter for Did you finish the book that you just created.


      The style section lets you change the appearance of your chart.  Play around with the settings and make your own choices.

      I added a text box for the section.  I find it is the easiest way to do this task.


      Most Popular Books Section:

      1. You will click on "add a chart" and select Table - the first one 
      2. The data source will be your Google Sheet
      3. Data Range dimension MUST be Timestamp
      4. Dimension is Book Title
      5. Metric is Book Title - click on edit after you add it - make sure count is selected.  See above for finding that edit button.
      6. Results per page should be 10 depending on your layout
      7. Sort add "Rate this book" - click on the edit after you add it - you will need to select how you want to work the rating aspect.  Mine is set to sum but I may change that as I test my data.  The options are Sum, Average, Count, Count Distinct, Min, Max, Median, Standard Deviation, and Variance.  I would suggest you talk with one of your math teachers for a recommendation.  I will be having a conversation about it with my math teachers.
      8. Go to the Style section and uncheck the box for "Show Pagination" unless you want it to appear.
      The style section lets you change the appearance of your chart.  Play around with the settings and make your own choices.

      I added a text box for the section.  I find it is the easiest way to do this task.

      Popular Authors Section:
      1. You will click on "add a chart" and select Table - the first one 
      2. The data source will be your Google Sheet
      3. Data Range dimension MUST be Timestamp
      4. Dimension is Author
      5. Metric is Author - click on edit after you add it - make sure count is selected.  See "Total books read section" for finding that edit button.
      6. Results per page should be 5 depending on your layout
      7. Sort add "Rate this book" - click on the edit after you add it - you will need to select how you want to work the rating aspect.  Mine is set to sum but I may change that as I test my data.  The options are Sum, Average, Count, Count Distinct, Min, Max, Median, Standard Deviation, and Variance.  I would suggest you talk with one of your math teachers for a recommendation.  I will be having a conversation about it with my math teachers.
      8. Add a Secondary Sort add "Author" and edit so count is selected
      9. Go to the Style section and uncheck the box for "Show Pagination" unless you want it to appear.
        The style section lets you change the appearance of your chart.  Play around with the settings and make your own choices.

        I added a text box for the section.  I find it is the easiest way to do this task.

      Popular Genre Section:
      1. You will click on "add a chart" and select Pie the first option
      2. The data source will be your Google Sheet
      3. Data Range dimension MUST be Timestamp
      4. Dimension is Genre
      5. Metric is Genre set to Count Distinct
      6. Sort on Genre set to Count Distinct (not sure if this makes a difference in this part or not)
      7. Interactions check the box enable sorting
        The style section lets you change the appearance of your chart.  Play around with the settings and make your own choices.

        I added a text box for the section.  I find it is the easiest way to do this task.

      Student VS Adults Section: You may not have this section
      1. You will click on "add a chart" and select Pie the second option looks like a ring
      2. The data source will be your Google Sheet
      3. Data Range dimension MUST be Timestamp
      4. Dimension is "Select One" or what question you used for student or adult
      5. Metric is "Select One" or your question set to "count"
      6. Interactions box is checked for Enable Sorting
      The style section lets you change the appearance of your chart.  Play around with the settings and make your own choices.

      I added a text box for the section.  I find it is the easiest way to do this task.  I also added a text box for the center of the ring "Who will win?"

      Show just the data you would like using the filters below! section:

      There are actually three Filters.  You will add one at a time.
      1. When you click on Filters (3 lines) a box outline will appear just like a text box
      2. I typed in the name for the filter
      3. The data source will be your Google Sheet
      4. Data Range dimension MUST be Timestamp
      5. Dimension is Grade or Team
      6. The Data Range you will click on the calendar icon - this will only work properly if you set each chart to have the Data Range Dimension as Timestamp.
      The style section lets you change the appearance of your chart.  Play around with the settings and make your own choices.

      I added a text box for the section.  I find it is the easiest way to do this task.

      One last thing:

      If you want to embed this on a website you will need the code and you will need to enable embedding.
      1. File
      2. Embed Report
      3. The checkbox "Enable embedding"
      4. You will need to select either embed code - New Google Sites will need this
      5. Or you will select Embed URL
      6. This depends on where you want to embed the display.  You can just get a link and share the link with others.
      You should now have a working Reading Dashboard.  The default for updating the data is every 15 minutes.  I need to find the place to adjust the time interval and I will update this post when I have that information.

      Part IV will cover the creation of the Teacher Dashboard.  

      You will collect a ton of data that teachers will find useful and helps to eliminate multiple reading logs when you share the data.